- 보통 웹개발을 하면 jsp를 많이 사용하였습니다. 하지만 spring boot에서 jsp를 지원하지 않음에 따라 jsp 대신 사용하는 템플릿엔진들이 있습니다. 현재 지원하는 템플릿 엔진은 4종류입니다.
1. Freemarker
2. Groovy
3. Thymeleaf
4. Mustache
이중 Thymeleaf 설정 방법과 간단한 사용법을 포스팅 하겠습니다.
- 먼저 Spring initializer 사이트에서 프로젝트를 생성합니다.

- controller 패키지 생성후 MainController를 생성합니다.

MainController.java
package com.example.thymeleafstudy.controller;

import org.springframework.stereotype.Controller;
import org.springframework.ui.Model;
import org.springframework.web.bind.annotation.GetMapping;
import java.util.HashMap;
import java.util.Map;

@Controller
public class MainController {

    @GetMapping("/")
    public String main(Model model){
        Map<String, Object> foodMap = new HashMap<String, Object>();
        foodMap.put("food1", "치킨");
        foodMap.put("food2", "피자");
        foodMap.put("food3", "삼겹살");
        foodMap.put("food4", "파스타");

        model.addAttribute("foodMap", foodMap);

        return "index.html";
    }
}
- templates 디렉터리 밑에 index.html을 생성합니다.

index.html
<!DOCTYPE html>
<html xmlns:th="http://www.thymeleaf.org">
<head>
    <meta charset="UTF-8">
    <title>Title</title>
</head>
<body>
    <span th:text="${foodMap.food1}"></span><br>
    <span th:text="${foodMap.food2}"></span><br>
    <span th:text="${foodMap.food3}"></span><br>
    <span th:text="${foodMap.food4}"></span><br>
</body>
</html>
개발 편의를 위해 build.gradle에 devtools gradle을 추가합니다.
implementation 'org.springframework.boot:spring-boot-devtools'
setting에 들어가서 기본 설정을 합니다.
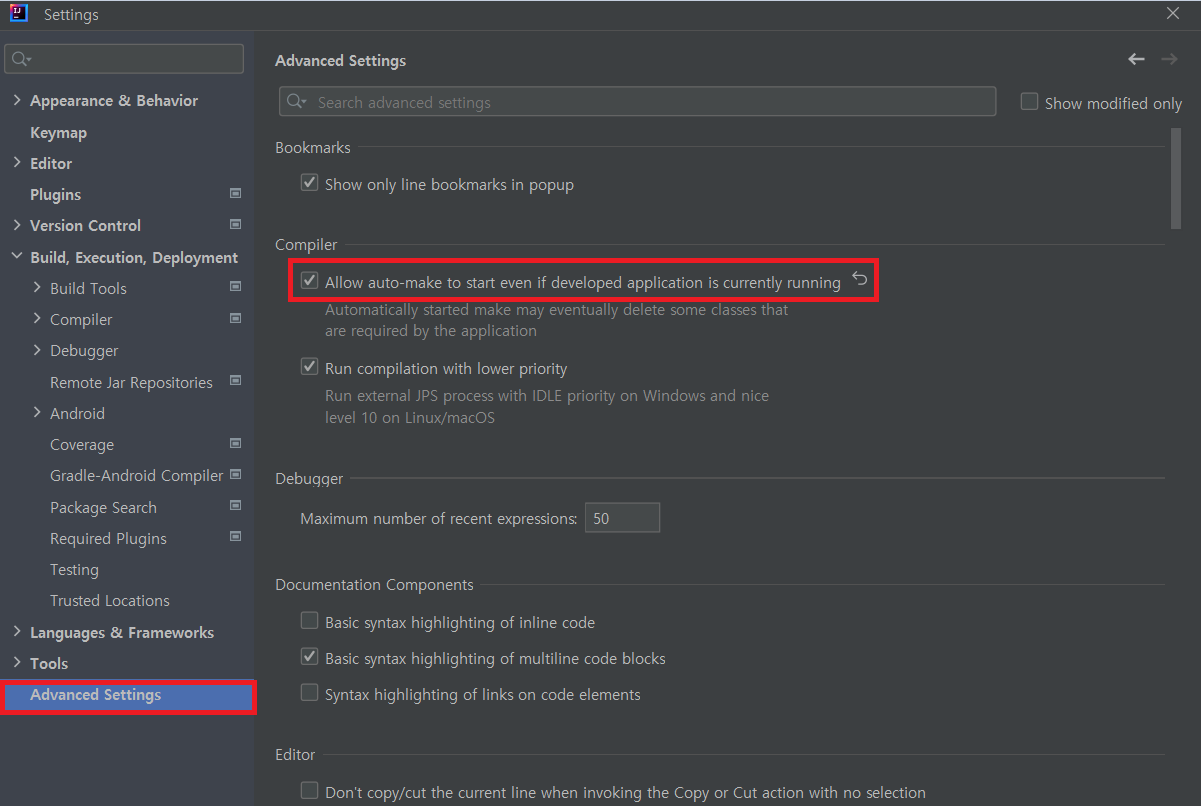
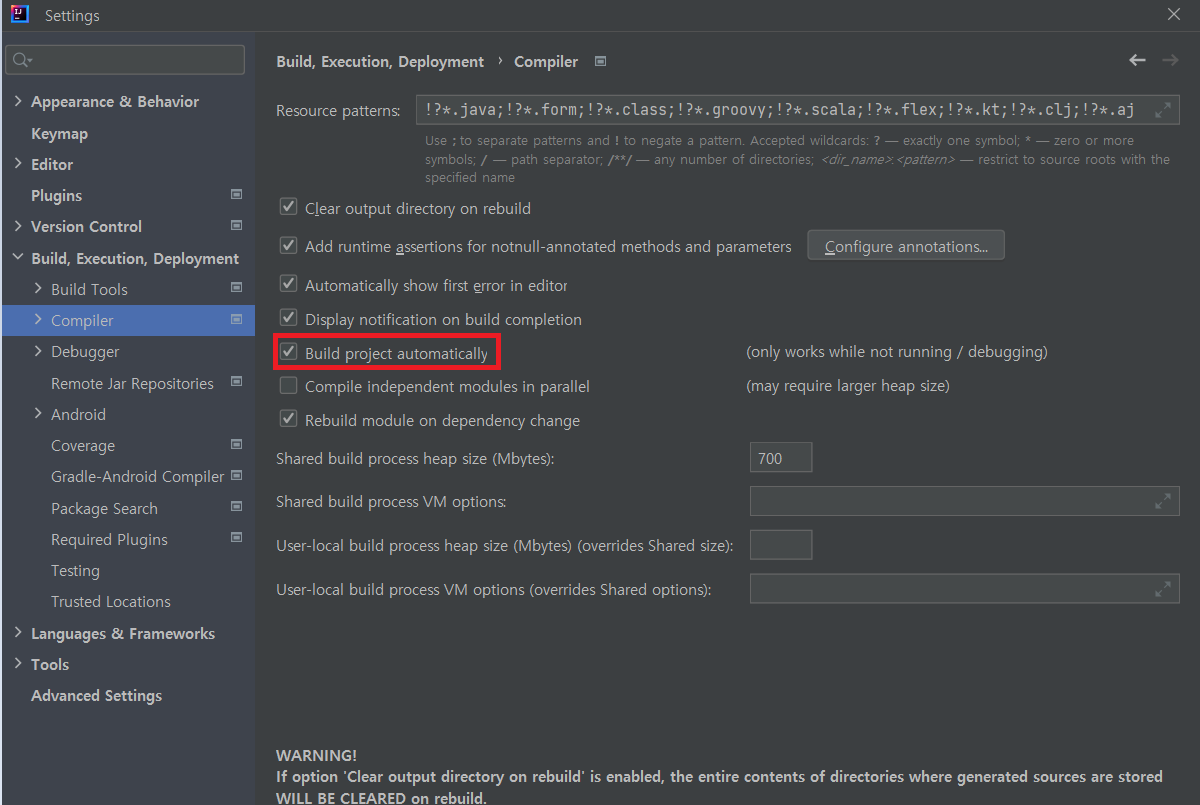
문법정리
th:text
<span th:text="${foodMap.food1}"></span><br>
'문자' + ' 더하기!' = <span th:text="'문자' + ' 더하기!'"></span><br>
'문자 더하기!' = <span th:text="'문자 더하기!'"></span><br>
'맛있는 ' + ${foodMap.food1} = <span th:text="'맛있는' + ${foodMap.food1}"></span><br>
리터럴 대체 :  <span th:text="|맛있는 ${foodMap.food1}|"></span><br>
<span>[[${foodMap.food1}]]</span><br><br>
th:text를 사용하면 해당영역 text란에 값을 설정합니다.

[[...]]
<span th:text="${foodMap.food1}"></span><br>
<span>[[${foodMap.food1}]]</span><br>
th:text를 사용하지않고 [[...]]를 사용하여 모델에 있는값을 표현할수 있습니다.
th:utext
<h2>th:utext 사용</h2>
<span th:utext="${foodMap.food2}"></span><br>
<span>[[${foodMap.food2])]</span><br><br>
foodMap.put("food2", "<strong>피자</strong>");utext를 사용하면 태그문자를 escape처리를 합니다.
th:utext를 사용하지않고 [(...)]으로도 표현이 가능합니다.

th:value
<span><input th:value="${foodMap.food4}" type="text"/></span><br>th:value를 사용하면 해당 영역 value에 값을 설정합니다.

resources 밑에 messages.properties를 생성

#{}
<span th:text="#{test.id}"></span><br>
<span th:text="#{test.name}"></span><br>
messages.properties에 있는 값을 가져와서 사용할수 있습니다.

th:href
<span ><a th:href="@{https://www.naver.com}">링크</a></span><br>

th:href
<ul>
    <li><a th:href="@{/hello}">basic url</a></li>
    <li><a th:href="@{/hello(param1=${param1}, param2=${param2})}">hello query param</a></li>
    <li><a th:href="@{/hello/{param1}/{param2}(param1=${param1}, param2=${param2})}">path variable</a></li>
    <li><a th:href="@{/hello/{param1}(param1=${param1}, param2=${param2})}">path variable + query parameter</a></li>
</ul>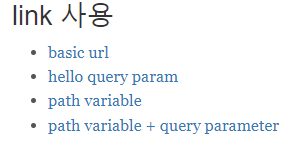
th:if, th:unless
<span th:if="${foodMap.food1} == '치킨'">치킨이다!</span>
<span th:unless="${foodMap.food1} == '치킨'">치킨이 아니다 ㅠㅠ</span>
-> th:if, th:unless는 if와 else로 생각하시면 됩니다. 사용시 주의할점은 조건이 같아야합니다.
switch-case문 사용
- th:switch
- th:case
<table class="table">
    <thead>
    <tr>
        <th>userName</th>
        <th>userId</th>
        <th>case</th>
    </tr>
    </thead>
    <tbody>
    <tr th:each="list : ${list}">
        <td th:text="${list.userName}"></td>
        <td th:text="${list.userId}"></td>
        <td th:switch="${list.userId}">
            <strong th:case="userId0">userId0</strong>
            <strong th:case="userId3">userId3</strong>
        </td>
    </tr>
    </tbody>
</table>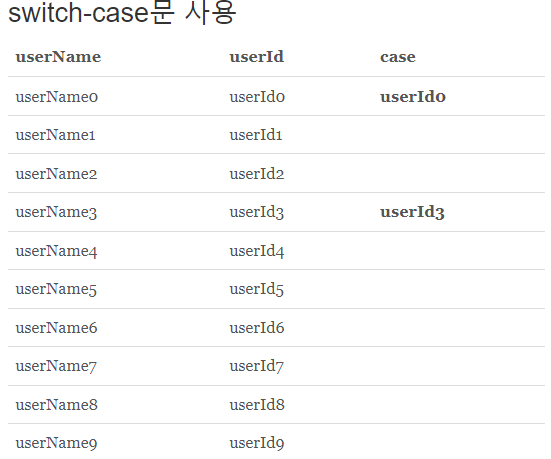
th-with 사용

<h2>th:with 사용 (c:set과 같은 느낌)</h2>
<span th:with="food='바뀐음식'">[[${food}]]</span><br><br>
component 사용
<h2>component 사용</h2>
<span th:text="${@helloBean.hello('babo!')}">[[${food}]]</span><br><br>
@Component("helloBean")
    static class HelloBean{
        public String hello(String data){
            return "Hello" +data;
        }
    }
식 기본객체
<h2>식 기본객체</h2>
request : <span th:text="${#request}"></span><br>
response : <span th:text="${#response}"></span><br>
session : <span th:text="${#session}"></span><br>
servletContext : <span th:text="${#servletContext}"></span><br>
locale : <span th:text="${#locale}"></span><br><br>
타임리프 날짜 지원 라이브러리 사용
- temporals
<h2>타임리프 날짜 지원 라이브러리 사용</h2>
default : <span th:text="${localDateTime}"></span><br>
yyyy-MM-dd HH:mm:ss : <span th:text="${#temporals.format(localDateTime, 'yyyy-MM-dd HH:mm:ss')}"></span> <br>
yyyy-MM-dd/a hh:mm : <span th:text="${#temporals.format(localDateTime, 'yyyy-MM-dd/a hh:mm')}"></span><br>
${#temporals.day(localDateTime)} : <span th:text="${#temporals.day(localDateTime)}"></span><br>
${#temporals.month(localDateTime)} : <span th:text="${#temporals.monthName(localDateTime)}"></span><br>
${#temporals.monthNameShort(localDateTime)} : <span th:text="${#temporals.monthNameShort(localDateTime)}"></span><br>
${#temporals.year(localDateTime)} : <span th:text="${#temporals.year(localDateTime)}"></span><br>
${#temporals.dayOfWeek(localDateTime)} : <span th:text="${#temporals.dayOfWeek(localDateTime)}"></span><br>
${#temporals.dayOfWeekName(localDateTime)} : <span th:text="${#temporals.dayOfWeekName(localDateTime)}"></span><br>
${#temporals.dayOfWeekNameShort(localDateTime)} : <span th:text="${#temporals.dayOfWeekNameShort(localDateTime)}"></span><br>
<br>
model.addAttribute("localDateTime", LocalDate.now());implementation group: 'org.thymeleaf.extras', name: 'thymeleaf-extras-java8time', version: '3.0.4.RELEASE'
attribute
- th:attrappend
- th:checked
<h2>attribute 활용</h2>
- th:classappend : <input type="text" class="text" th:attrappend="class= ' large'" /><br>
- checked o : <input type="checkbox" name="active" th:checked="true" /><br>
- checked x : <input type="checkbox" name="active" th:checked="false" /><br>
<br><br>
th:each
<table class="table">
    <thead>
    <tr>
        <th>userName</th>
        <th>userId</th>
    </tr>
    </thead>
    <tbody>
    <tr th:each="list : ${list}">
        <td th:text="${list.userName}"></td>
        <td th:text="${list.userId}"></td>
    </tr>
    </tbody>
</table>
'frontend > 타임리프' 카테고리의 다른 글
| 타임리프 유효성체크 (0) | 2022.07.19 |
|---|---|
| 타임리프 서버 재시작 없이 view 파일 변경 (0) | 2022.07.18 |
| 타임리프 참고 사이트 (0) | 2022.07.18 |
| [타임리프] layout 설정 (2) | 2022.07.15 |

